
Intro
Hello reader! This is the first post in a series that I’ll be writing detailing how to create a production environment cyber lab. This post will be going over the planning process, networking considerations installing and configuring both a Domain Controller and Active Directory server and more. Let’s get started!
Planning a Cyber Range
This first task sounds (and quite frankly is) super daunting; why? Because it’s natrual that we don’t want to make any mistakes and truthfully there are no easy guides out there to get the exact configuration you may be looking for. Hopefully with this guide I’m able to explain my thought process, what my goals are, and what tools I’m going to reccomend using. First lets define my goals.
- A range that doesn’t need enterprise equipment to run.
- An environment where we can simulate red team activity and learn their tools.
- Simulate a vertical slice of a typical enterprise domain environment.
- Ingest various logtypes into a SIEM that is accessible to others.
- Lastly, allow for future scaling in case the scope changes.
With all these goals defined we can really start the planning process. Below is a picture of a network map that I created with those listed goals in mind.
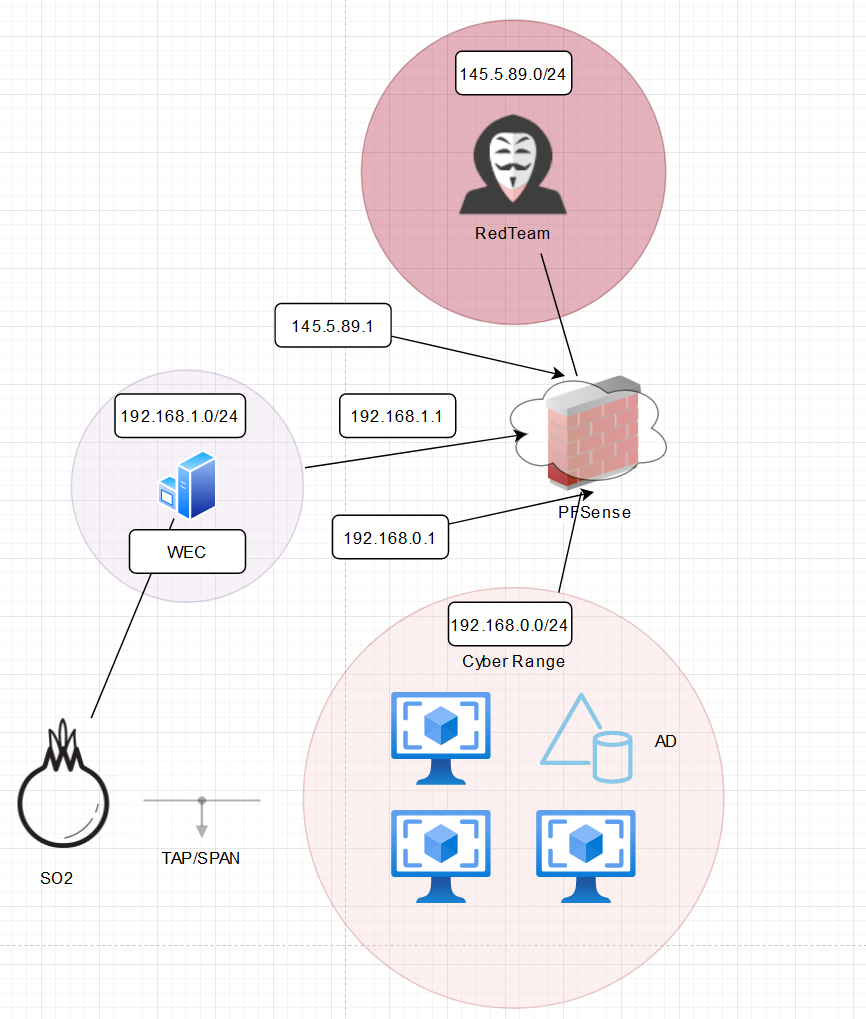
The first thing you may notice is that there are 3 networks, the “Cyber Range” where our Domain Contoller and hosts machines will live, our “WEC” network where we have a singular Windows Event Collector and lastly a “Red Team” network where our attacks will be coming from. You may be wondering; why 3 domains? This is actually a solution to a problem inherent to Proxmox/SecurityOnion2. The only way to ingest host logs into our SecurityOnion2 SEIM is through pointing the logs from a centralized server to our SIEM and opening up our SIEM’s firewall. The way network log ingestion is handled is through creating a mirror of the “Cyber Range” network in Proxmox and pushing the network traffic to our SecurityOnion2 interface. Because this is a true mirror, any host log traffic directed at the port wouldn’t be ingested. Thus, creating another network and attaching that interface to our SIEM without a mirror will allow us to bypass this issue. The only problem with this solution is extra networking will need to be done in order to make sure our WEC is attached to our Domain and the appropriate networks are created. I will talk more about networking in the next blog post.
Building the Range
Before we start with building our range it’s important we have the prerequisites defined/created.
Inside Proxmox we need the following created. (Examples will be based off the network map listed above.)
3 Networks need to be created inside Proxmox.
1
2
3
 a. CyberRange: OVS Bridge 192.168.0.0/24
 b. WEC Network: Linux Bridge 192.168.1.0/24
 c. Red Team Net: Linux Bridge 145.5.89.0/24
NOTE The CyberRange network needs to be an OVS bridge as it’s the only way to create a mirror in Proxmox. Below are the commands to install openvswitch in order to create an OVS bridge.
1
2
 apt update
 apt install openvswitch-switch
Next you will need to upload some VM’s if you don’t already have them. You will need to have a PFSense, Windows 10 and Windows server 2016/newer ISO, and lastly Windows VirtIO drivers that can be found here.
From here you will want to create what will be your primary Domain Controller as well as your active directory. In Proxmox when creating the VM make sure you attach a NIC located inside your CyberRange network, make sure you select VirtIO SCSI as your controller and select write-back for optimal cache performance. Before powering on your machine you will want to add another CD/Disk Drive and select a the WinVirtIO drivers so we can import more drivers for better Windows performance. This is a pretty standard Windows installation, just keep in mind a few things:
A. You will want to select a desktop environment installation.
B. You will want to select a custom install.
C. You won’t be able to see your virtual hard disk for mounting, that’s when you need to point to the drivers. I recommend installing these 3 drivers in the following locations on the D: drive where x.x.x.x is your version of Windows.
1
2
3
4
5
6
7
8
9
 1. D: virtio-win-x.x.x
     viosci
         Win2k19
 2. D: virtio-win-x.x.x
     netkdm
         Win2k19
 3. D: virtio-win-x.x.x
     balloon
         Win2k19
TIP: As a helpful reminder I have a guide listed below with instructions on how I have my homelab setup which has a walkthrough of setting up a Windows VM in proxmox if you’re having trouble.
Once the install completes you should have a fully fuctioning Windows Server 2019 install. From here you will begin the process of creating your Domain Controller and Active Directory server. Because this is a simple range you don’t need to have a complex setup and simply installing a default configuration is sufficient. The folliwng are the steps you need to complete in order to get your server stood up.
Inside your Windows Server install in server manager click
1
 Mange > Add Roles and Features
- You will be prompted with a before you begin screen, you can click next to ignore this.
- You will want to keep Role-based or feature-based installation selected and click next.
- Make sure your server here is selected and take note of the IP address. If you haven’t already manually assigned an IP address you will want to ensure you do that after install. Press next to select your server and press next.
- Under Server Roles you will want to make sure you select Active Directory Domain Services and press next. NOTE If you want to add more services now you can, however you can always add services later.
- Confirm the features that will be installed and press next.
- You should see a list of changes presented, press Install to begin installing the Active Directory package.
- Once install finishes you should be prompted with a warning flag that you should promote this server into a Domain Controller, which is absolutely what we will be doing. Make sure you click that button to start the process.
- You will want to create a new forest and name it something that will be used as your organization. Something like customer.com. Whenever you create a new user they will need to put customer.com at the end to login to that account in the domain. Click next once confirmed.
- You should receive an error saying that a delegation for this DNS server couldn’t be created. This is fine and can be ignored. It’s important to understand that this server will be your primary DNS server for your other devices, and any device that you want to connect to your domain will need to have the IP address of this server designated as their primary DNS server.
- Click next to confirmt the NetBIOS name and change it if you feel it necessary.
- I recommend leaving the default file paths and clicking next to continue.
- You will then see the prerequisite check and should see a lot of error messages. These are fine and you should have no problems instaling the Domain Controller service. If you have any problems repeat these same steps.
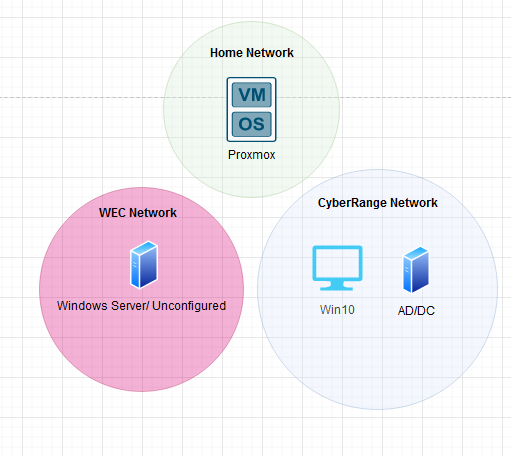
Awesome! You have now built a Domain Controller and are hosting your Active Directory service. Now what? Now it’s time to create 2 more virtual machines to propagate your networks. You will want to repeat the same steps listed in Step 3 except I recommend deplying a Windows 10 VM in your “CyberRange” network and another Windows Server in your WEC network. If you’ve followed my guide, you should now have a network that looks similar to this:
Conclusion
Let’s briefly go over what was acomplished and give a brief quick recap that way we know where to pick up on the next blog post.
A. We were able to define our goals in creating this Cyber Range.
B. We planned out a network map that allows communication over 3 networks with consideration to SIEM ingestion.
C. We imported the necessary VM’s into Proxmox and created the necessary networks in Proxmox.
D. We created and deployed a Windows Server, with optimizations for Windows Hosts in a Linux hypervisor.
E. We deployed and configured our Active Directory server and promoted it to our primary Domain Controller.
F. We deployed 2 more VM’s, our WEC attached to our WECNetwork and a Windows 10 host machine inside our CyberRange network.
If you’ve made it this far; THANKS! I appreciate you taking the time and I hope you found this useful. If you’re following this blog, make sure to prepare yourself for the next post you have your AD/DC stood up, and the 2 toher aforementioned VM’s configured in preparation. Take care!