
Home Lab Principles
I thought it would be fitting for my first post to be about the homelab that I designed, created and built. There are a lot of homelab guides on the internet, but I noticed that none of them seem to have a focus of learning cybersecurity principles. With that in mind, my homelab is designed to serve 3 main functions.
- Create a sandbox environment airgapped and isolated from the rest of my network.
- Have the ability to send exploits to a target of my choosing imitating real-world scenarios.
- See how those exploits look in a SIEM to develop future analytics.
TLDR: There will also be a PDF linked below for more detailed instructions on how exactly I set everything up if you’re looking for a more comprehensive guide.
Hardare In Mind
For my homelab I bought a Ryzen 9 3900X 12 Core CPU, installed 64GB of RAM and have dual 14TB platters running in a tower like case. My personal recomendation is to have at least 12 availables cores and 32GB of RAM; why? I feels it’s necessary to implement the 3rd core function into this homelab; which is a SIEM. My SIEM of choice is SecurityOnion2 which is known to be resource intesive. Even though you can still send exploits, with a SIEM you wouldn’t be able to fully understand or see what the exploits look like from your defensive view.
Getting Started
I’ll be using Proxmox as my primary Type 1 hypervisor. Why Proxmox? It’s a free and intuitive hypervisor that I didn’t have much initial experience using. To get started you will need to flash the Proxmox OS to a bootable driveand begin installation. Listed below are links to download proxmox as well as a very popular open-source bootable .iso converter.
Proxmox Download: https://www.proxmox.com/en/downloads/category/iso-images-pve
Balena Etcher Download: https://www.balena.io/etcher/
Once you’ve got the install finished and are ready to login,make sure you take note of the IP address you assiged to your server, this will be the IP address you use to access it over port 8006. I recommend assigning a static IP that’s located in your home network (like 192.168.x.200). Once you have completed the installation, it’s always best practice to make sure your Proxmox installation is up-to-date. Follow the steps below to ensure you’re running the most up-to-date software.
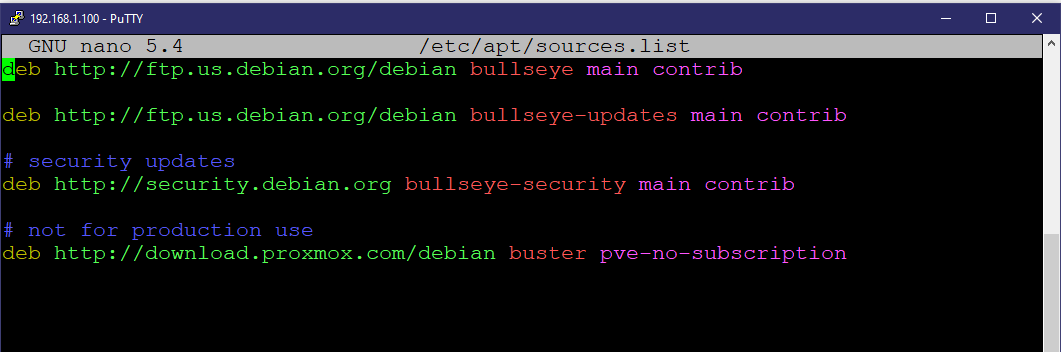
- You will want to first update the list of websites your Proxmox repo can pull from. Edit your /etc/apt/sources.list directory and add a line named not for production use. It should look similar to the image below.
!1Repo
- Next you will want to edit the enterprise list in /etc/apt/sources.list.d/pve-enterprise.list and comment out the enterprise features.

- Lastly you will want to update your system to do that type the following commands:
1
 apt-get update
1
apt-get upgrade -y
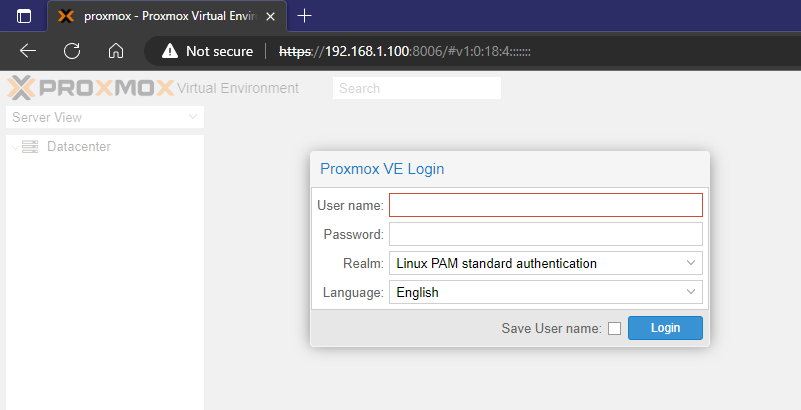
There you go! You know have a working Proxmox server! Make sure you can login by going to your IP address over port 8006 in a web browser. You should see something similar to below.
Configuring Internal Networking
This is where the guide starts the get tricky. Again, if you have any problems read the detailed PDF below for more step-by-step instructions. You will want to go to the network tab of your main node. From here you should see at least 2 interfaces; a virtual bridge that our VM’s use to access our home network, and the physical interface proxmox uses to access that network. We want to create a third and fourth bridge that we will use to segment our homelab from the rest of our home network. To start you will need to create 2 bridges.
- The first bridge is an OVS bridge, this will be our “customer network”. I gave mine an IP address schema of 192.168.3.0/24. We use an OVS bridge here because we will want to mirror just this traffic and send it to our SIEM when we configure that later.
- The next bridge will be a Linux bridge. This network will be our “red team” space. I gave mine an IP schema of 192.168.2.0/24.
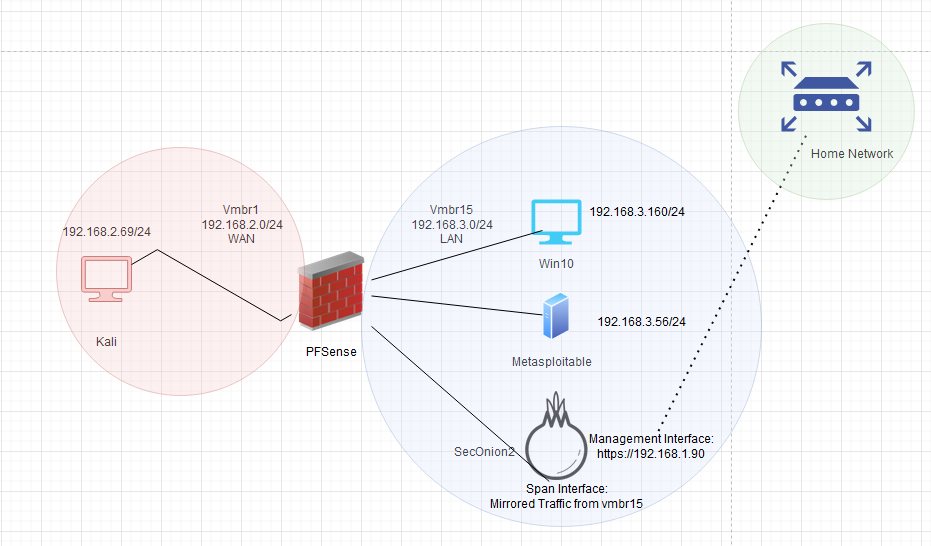
Once you have those configured you’re now ready to begin installing and configuring your VMs. For reference, here is a network map of the setup that we’re going to be trying to emulate.
Virtual Machines
In this deployment we will be utilizing mutliple Virtual Machines. These should be relatively straightforward to setup and configure. If you’ve never configured VM’s in Proxmox before use my guide as a reference (and don’t forget to import them into your Proxmox server!). I will be listing each VM and it’s usecase below. The last section of this blog post will detail how to configure SecurityOnion2 after we have finished.
- PFSense
- This will be acting as your edge router into your customers network. When configuring PFSense you will want to configure “red team” space as the WAN and “customer” space as the LAN. You can ultimately configure PFSense to your hearts content. I have used this setup before to demonstrate and teach firewall rules and the effects they have on traffic.
TIP: You won’t be able to access the PFSense WebGUI from the WAN side.
- Windows
- Setting up Windows is a fairly straightforward process. In my current setup, I’m only deploying Windows 10 and Windows 11 VMs. It’s worth considering if you have a more powerful setup than I do, to import more VM’s and incorporate an Active Directory environment. This way you will be able to have a more comprehensive and realistic environment.
NOTE: If you’re following along with my guide, pay close attention to the VM creation process as well as importing in Windows drivers from Proxmox for maximum efficiency.
- Metasploitable
- For those not aware, a Metasploitable box is a Virtual Machine that’s designed specifically to be highly vulnerable. This makes a great testing tool because most exploits can be thrown at a Metasploitable box to confirm validation. Metasploitable can be tricky to install in Proxmox however, because Proxmox doesn’t natively support vmdk images which is currently the only way to get a valid copy. You will need to push the vmdk metasploitable image to your Proxmox via either putty/ssh and then use the built in qcow converter to make the image readable.
- Kali
- A fairly straightforward installation. In a future post I will show how to import other more advanced penetration testing tools and give a more thorough tutorial. You can also susbititute this VM for any other flavor of pentesting distro you’d like.
- SecurityOnion2
There are many different types of SecurityOnion2 deployments and I recommend you read their documentation for setup if you’re unfamiliar with them. I will provide a link below if you’re interested. I configured this SecurityOnion2 instance to be a Standalone node as that’s all the resources I have to spare. If you’ll be running tight on resources I would consider deploying an import node and finding malicious pcaps online and importing them that way. When setting up SecurityOnion2 there are 3 main phases to deployment.
a. Installation of OS.
This is a pretty straightforward process. In proxmox just make sure you remember the login credentials you create and installation should give you no problems.
b. Configuring the node.
This is typically where most of the issues occur. Here are some tips from someone who has deployed quite a few SO2 instances. First make sure your manager NIC is setup to be your internal home network. This way you can access Kibana and other tools without needing to jump into a VM. Always assign a static address that way DHCP doesn’t cause you problems in the future. You will then want your sniffing interface to be the “customer network” bridge which will sniff that network and allow you to see those logs. Be patient! I’ve seen install some times take upwards of 2/3 hours before completing. These are the vital steps that most people mess up on. Again, I go into more detail on each setting in my homelab listed at the bottom if you’re interested in the choices I made or need help making your own decisions.
c. Post setup tuning. Here is where you will want to make additional user accounts from the one you created in setup if you feel the need to. You will also want to run so-allow and press “a” to allow any hosts you want to have access to the SOC and other tools. Additionally you can tune IDS rules, import intelligence, and customize your SOC to best fit your needs. I’ll be posting a guide later on importing intelligence, if that interests you be on the lookout!
The last step for incoprating SO2 into the environment is to ensure that we can receive network logs. During setup we designated our “customer network” NIC as our sniffing interface which is only half the problem. We have to make sure that all traffic gets redirected to this interface so we can get the whole picture. We can accomplish this through the use of port mirroring inside of Proxmox. Listed below are the steps needed to configure port mirroring:
- Putty/ssh into your Proxmox environment.
- Install the following package
1
apt install openvswitch-switch ethtool - Once installed we will configure port mirroring on that specific interface using this one-liner. Make sure to replace vmbr15 with the name of the bridge you gave the customer network.
1
  ovs-vsctl -- --id=@q get port tap 110i1 -- --id=@m create mirror name=spann select-all=true output-port=@q -- set bridge vmbr15 mirrors=@m
If you were able to successfully run the one-liner you should have received a uuid value of your new port. You can then use the following command to show if you have any mirrors inside your Proxmox deployment (you should see 1)
1
  ovs-vsctl list mirror
NOTE: An important thing to note about setting up this mirror is that it isn’t persistant. You will need to write a cronjob on boot replicating that one-liner anytime you either take-down Proxmox or your SO2 deployment, otherwise your mirror won’t be online.
SecurityOnion ReadtheDocs: https://docs.securityonion.net/en/2.3/
Validating The Range and Troubleshooting
Range validation is super straightforward. If you configured your range exactly as I have then all you need to do is go to your Kali box and make sure that you can ping your Metasploitable VM. If you weren’t able to setup/configure Metasploitable, then you can ping the Windows box after having disabled the Windows firewall. If you’re pings are successful, then open up your SOC instance and make sure you can see the connection attempts and if so; then you’re good to go. If for whatever reason your pings aren’t going through, make sure in your PFSense VM that you are able to ping both a host inside your customer network and your red team box. If you can then you may have to edit your PFSense firewall rules to allow traffic. If you can’t, then you need to check your proxmox networking and validate that you setup everything correctly.
That’s It!
Once you have all the VM’s setup and running you should be able to start playing around in your sandbox. I know this guide didn’t go too much into specifics on how to actually setup everything but that is the puprose of my guide listed below. Again, if you have any questions or thoughts, please don’t hestitate to reach out and contact me via the links below!