
Cyber Range PT II

Welcome back! In part 2 of this blog post we will be configuring our networks, configuring PFSense and joining servers/workstations to our domain. Let’s get started!
Where we left off
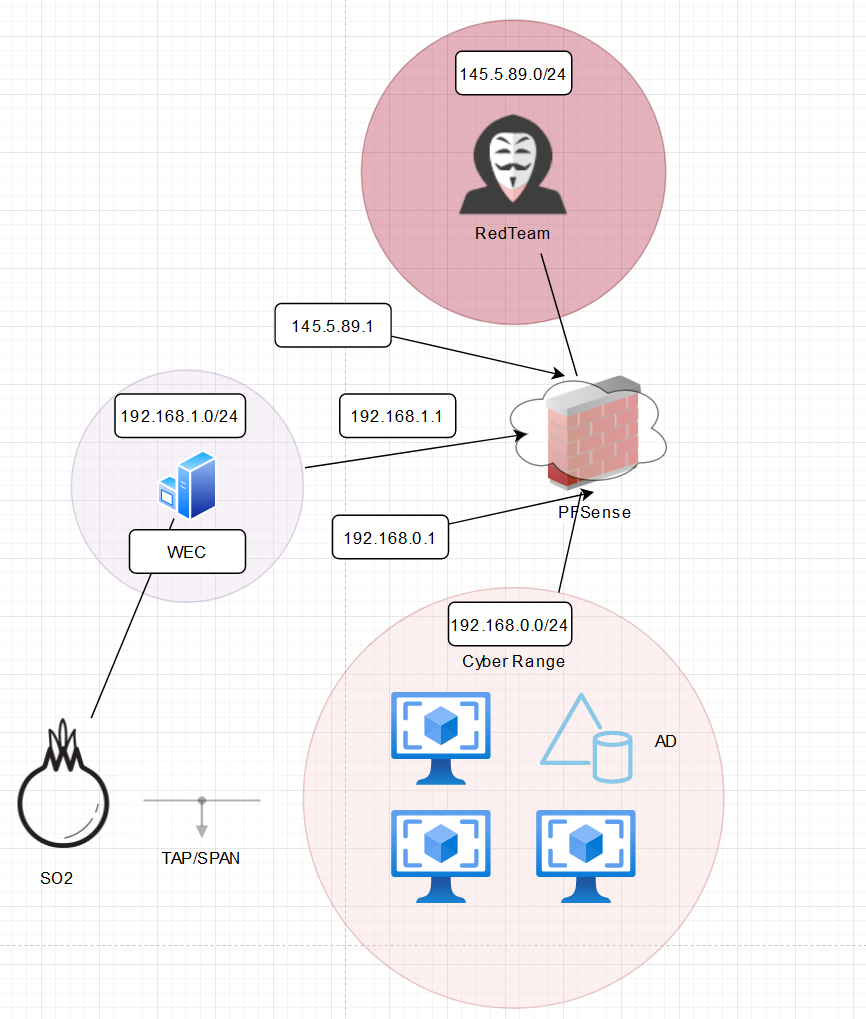
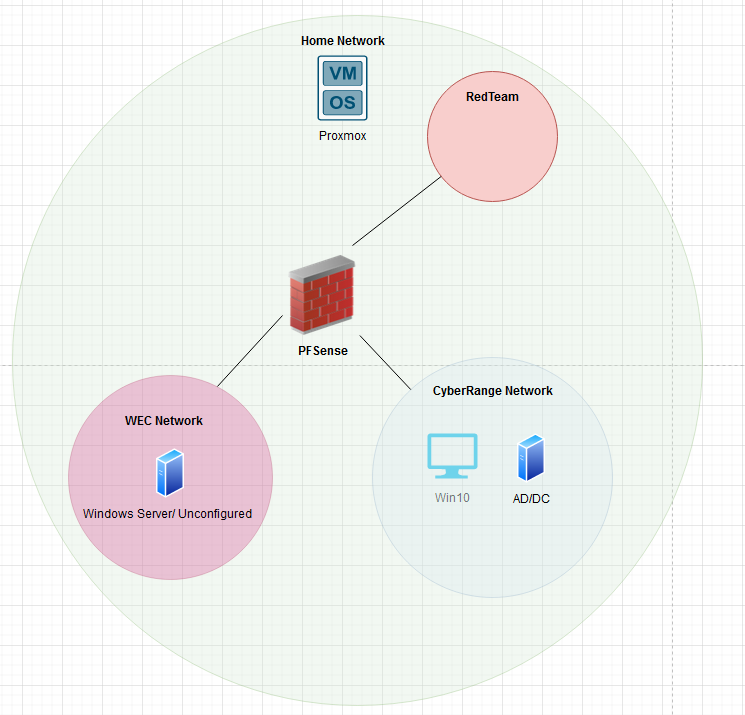
On my last blog post (that you can find on the right-hand side) we talked about the planning process, established how we were going to handle our networking, deployed an Active Directory / Domain Controller and deployed two other VM’s. As of this point, none of the VM’s are able to talk with eachother and we don’t really have much of a testing environment. To change that we are going to begin by allowing our devices to talk to eachother. We accomplish this through networking. Just for reference, here is the network we are trying to emulate.
Networking
I understand networking is something that can be pretty daunting for some people. I’ll give a huge disclaimer upfront that there may be better ways of doing what I’m doing, but I found this works for me and is relatively easy to understand! For this networking configuration we need to really only complete 3 goals.
We need to ensure that the Windows Server VM in our WECNet can talk with our Domain Controller in the CyberRange net so that it can join the domain.
We need to make sure the RedTeam has a way into our network to better emulate real-world scenarios. But also have the ability to apply blue team principles (firewall rules, IPS rules etc.) to test what works and what doesn’t.
We want this environment to be air-gapped from the real-world that way we have a true sandbox environment.
If not obvious already, our primary way of accomplishing these goals is going to be through our router/firewall combo PFSense. The first step is going to be installing and running through a basic configuration of PFSense. I have a guide linked here homelab walkthrough that has a section on installing and configuring PFSense. The only caveat is that you will want to make sure that your PFSense has 3 network interfaces attached to it before installing the OS.
Network Device net0 should be your Red Team bridge (network)
Network Device net1 should be your Cyber Range bridge (network)
Network Device net2 should be your WEC bridge (network)
During the initial configuration you will want to configure your Red Team network as your WAN interface and your Cyber Range as your LAN. These should be relatively straightforward and again, if you have problems use the homelab guide as a reference. You should know if your configuration is successful if from the Win10 VM you configured you can access the PFSense admin interface from a web browser. The IP address of this admin interface will be the LAN gateway IP you configured in PFSense.
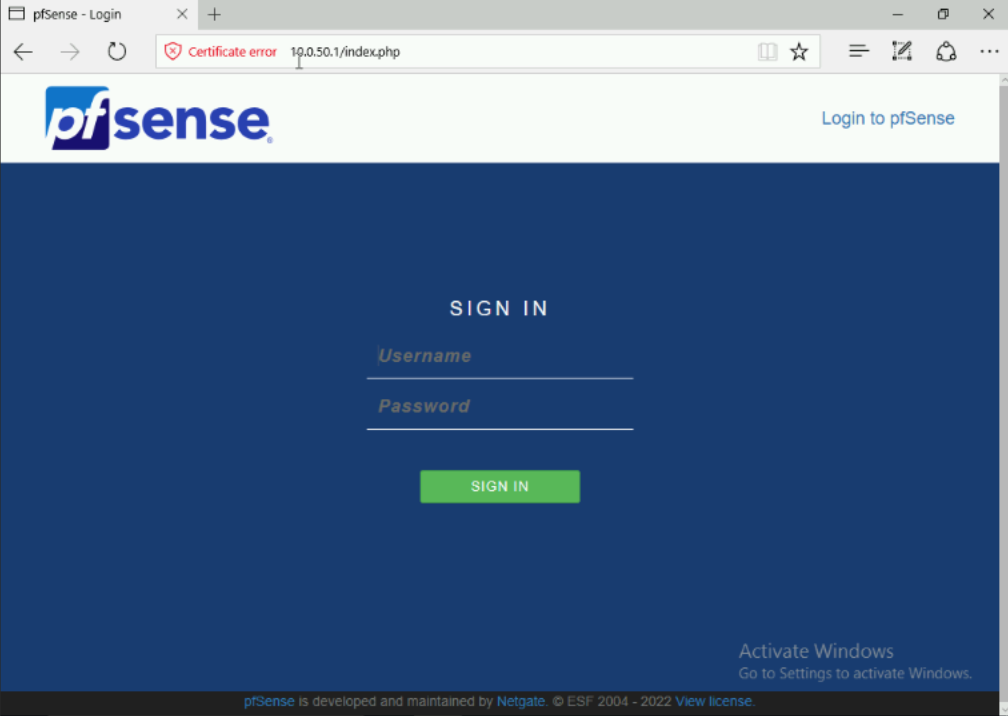
The default login credentials will be Admin:pfsense. After logging in you will be presented with a basic configuration page, if you setup PFSense correctly the only change you will need to make is changing the default creds. From here we can really begin the networking.
The first thing you will want to do is verify your configurations. Mainly that your two primary interfaces are set correctly.(you’re RedTeam interface is set to WAN and enabled, and your LAN interface is set to your Cyber Range and enabled)
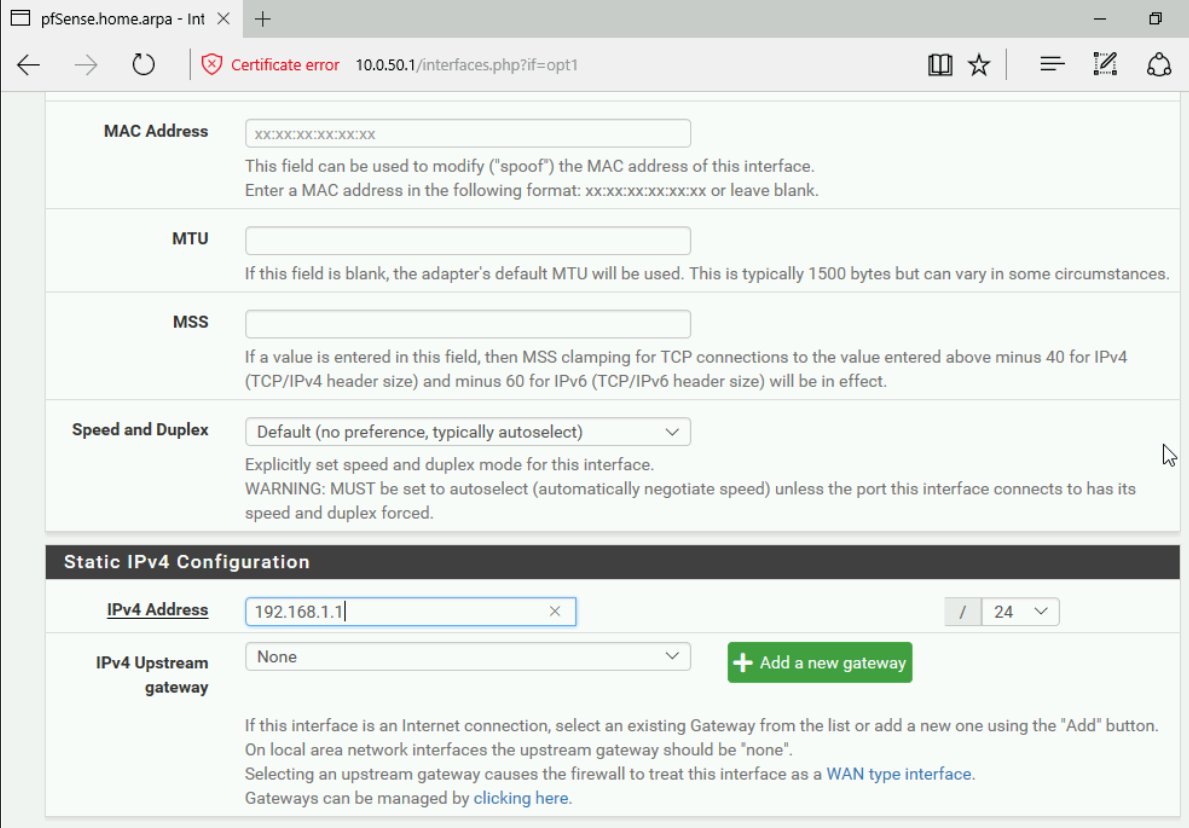
Next we will want to enable our WEC network from within PFSense. If you go to interfaces > assignments you should see your third interface. You will want to add that interface and click on the interface name to configure it. From here you will want to make sure it’s enabled, give it an appropriate description, a Static IPv4 configuration type and lastly you will want to put in a static IP address that will be your WEC networks default gateway. Listed below is an example of my WEC configuration.
- Next you will to create firewall rules in PFSense that allow traffic to go from your WEC network into your LAN and vice-versa. Firewall rules are located under the Firewall tab, under rules and are defined by each specific interface. Here is an example from my firewall rule applied to my LAN interface that allows any protocol (important for DNS) with any source address into that network.
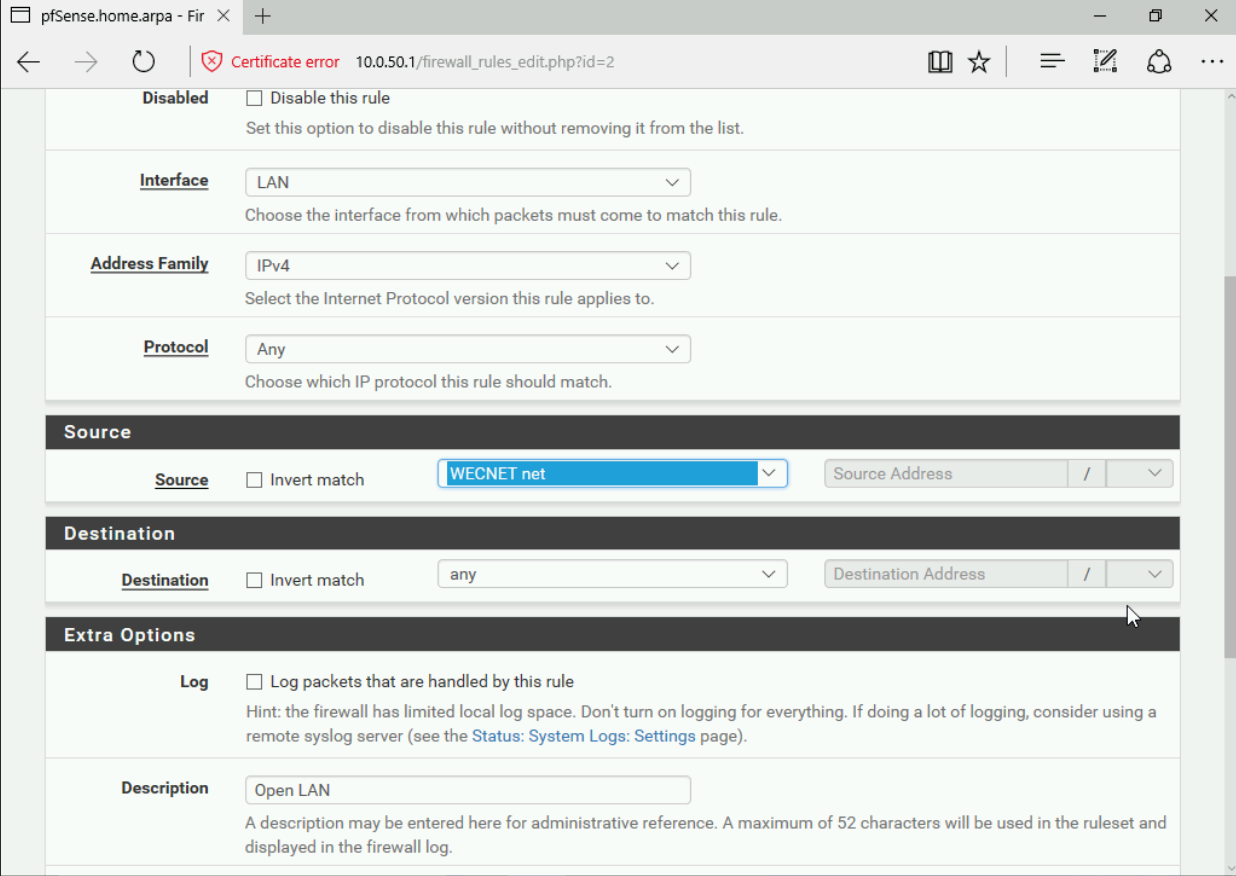
You will want to apply the same rule to your LAN interface as well. I would also still allow the RedTeam space into the network by creating the rule in a way where any source address is allowed internal access.
DISCLAIMER: I know that it’s not best practice to be this loose with firewall rules. I also know that you could tighten these rules and only allow specific traffic off specific ports in specific directions. But for the purposes of this lab we want the ability to replicate Red Team activities and if we were to lock dowwn the firewall too much that goal would be impossible.
- The last major configuration you will want to do is configure DNS forwarding so that you can set the primary DNS on your WEC to be the IP address of your DC/AD server. To accomplish this in PFSense, first you must go to your General setup settings under system. Then scroll down to DNS Servers and put the IP address of your DC/AD server as seen here:

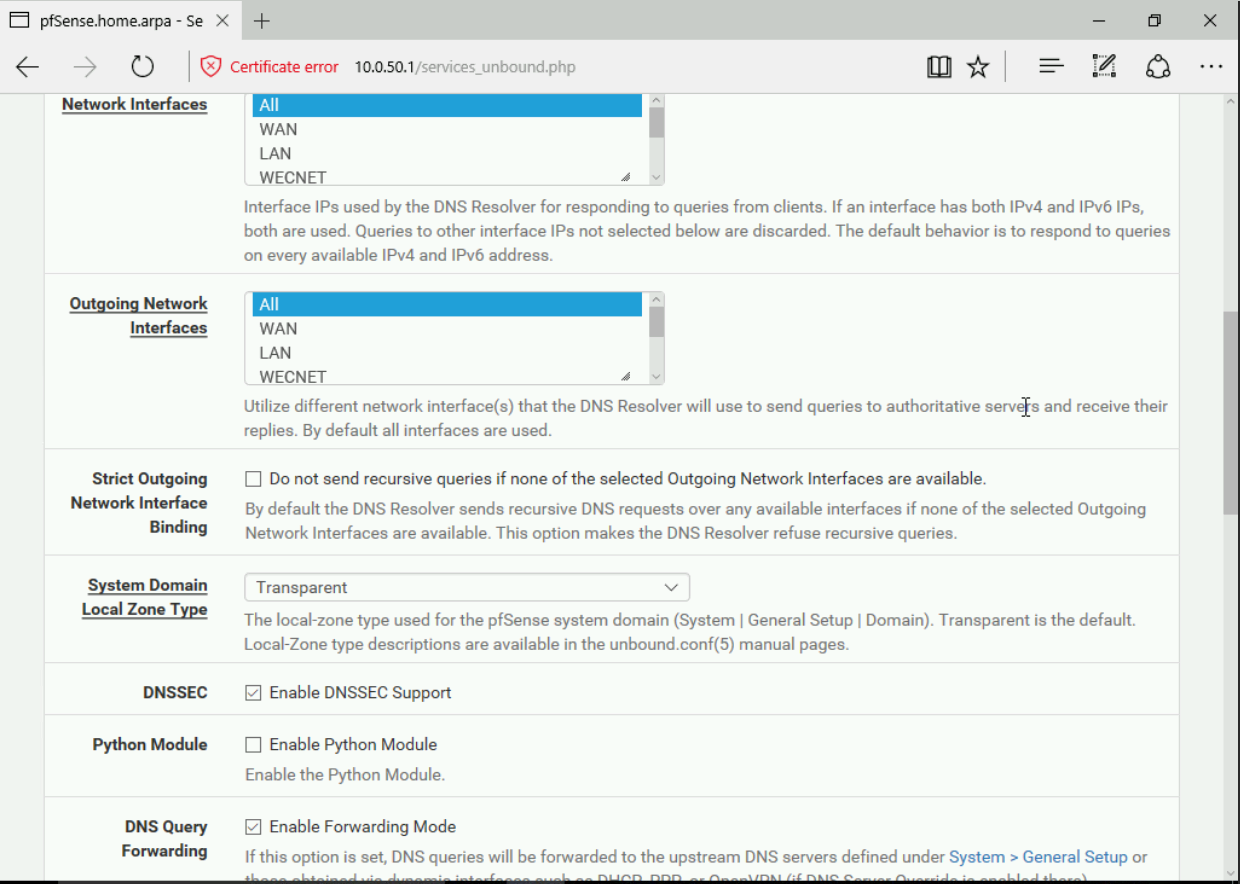
- Now we’re ready to configure DNS forwarding. Inside PFSsense you will want to go to the Services tab > DNS Resolver. Make sure it’s enabled and scroll down, make sure that for network interfaces you either have “All” selected or your WEC network. You will then also want to check the box “Enable Forwarding Mode”. This will make all DNS requests from the interface(s) you specified point to the DNS server previously configured in the default tab. Make sure you commit any changes made in PFSense in order for them to take effect.
Verifying the Configuration
Now that we have our networking setup we should be able to configure our devices to talk back to the DC/AD and allow them to join the domain. Let’s test this configuration on our WEC in a different network.
Make sure you login to your WEC and configure the networking based off your personal IP schema. Just note that the Default Gateway will be the value you set in PFSense and your Preferred DNS server will be the IP address of your AD/DC. Here is an example of my WEC’s configuration.
TAKE NOTE of the different subnet the DNS server is in from the primary IP address!

If configured properly you should see a notification from Windows asking if you want to share this device across the network (public vs. private internet domain). If not you may have a misconfiguration, but before troubleshooting first see if you can join it to the domain.
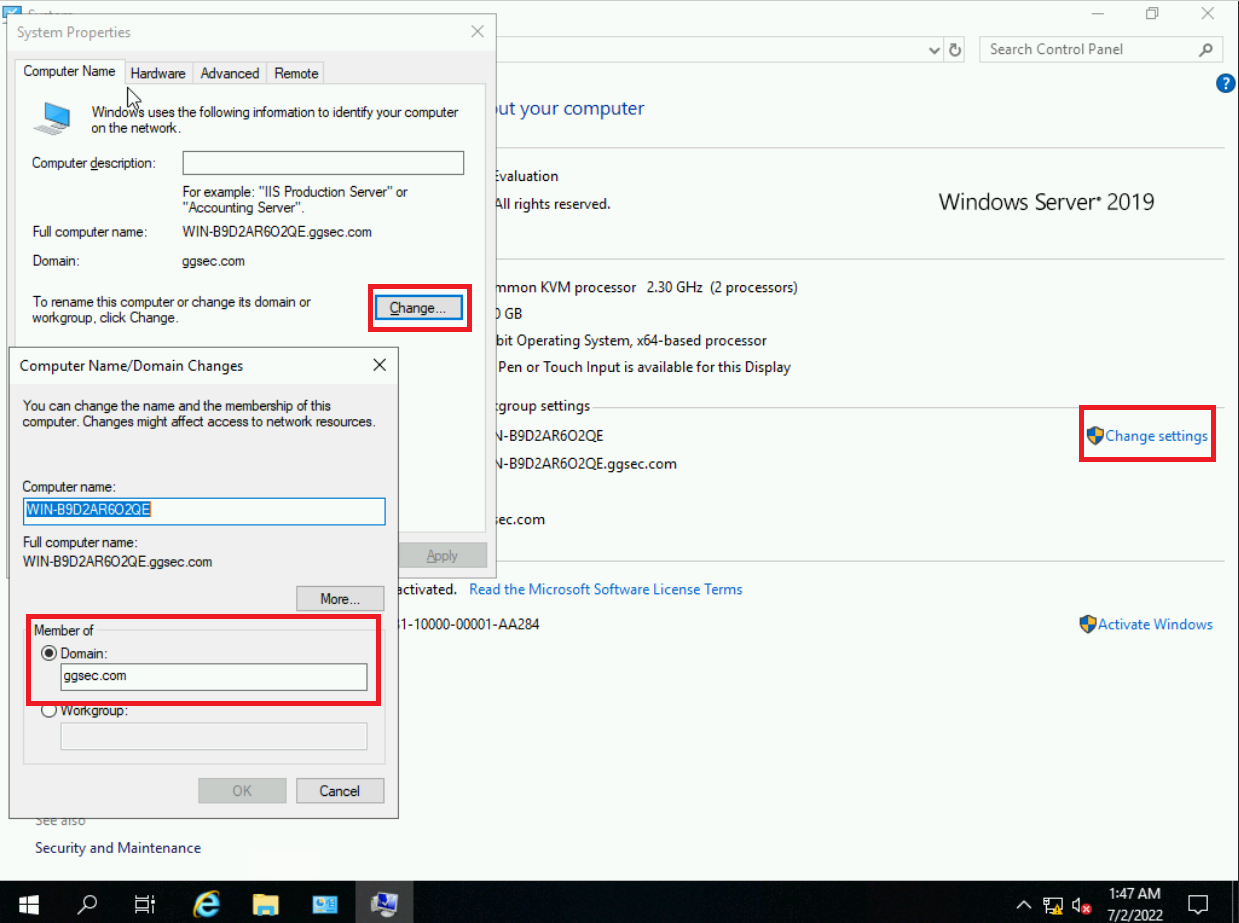
Joining a workstation to a domain is a relatively simple process.
Go to your control panel and then open up system.
Next you will want to click Change settings and then click change to add a Domain and change the name of the computer. Changing the name of the computer is optional but use the schema you defined in the last blog post to authenticate to the domain. If successful you should be prompted for domain admin credentials. If you don’t know / don’t remember you can always log back into your DC and go to System Tools > Users and Groups and add a domain user there. Once, it’s succesful congratulations! You have successfully configured cross network domain administration.
Summary
Let’s summarize; we first installed and configured PFSense. Then we logged into our PFSense web admin interface and futher configured basic firewall rules and DNS forwarding. Lastly we validated our configurations through joining our Windows server in our WEC to our domain. Given all of the above, you should have an internal network that looks something like this:
Next Time
For my next blog post, I’ll be going over host log ingestion into a SIEM. If you’re following along chronologically you can jump right into that guide as you will almsot have all the prerequrisites already, however host log ingestion isn’t mandatory for an environment like this. The next post in this series will be the last and we’ll be configuring our SIEM, configuring our Red Team environment and talking about how to expand this environment in the future. Thanks for reading along and have a great rest of your day!